


What is React Router?
React Router is a lightweight, fully-featured routing library for the React JavaScript library. React Router runs everywhere that React runs; on the web, on the server (using node.js), and on React Native.
Brief explanations and examples on how to use react-router v6:
The heart of React Router is the concept of a route. A route represents a "page" in your app (or a "view" if you're on React Native). React Router represents routes internally with URLs, also called "locations". React Router lets you declare React elements that it renders when the user visits a route.
One really quick thing right off the bat—React Router v6 is a lot smaller than its predecessor. For example, a quick high-level comparison of the bundles for react-router-dom@5.1.2 vs. react-router-dom@6.0.0-alpha.2 reveals the total bundle size decreased by 70%. Smaller bundles means your app loads more quickly, especially over slow/poor network connections.
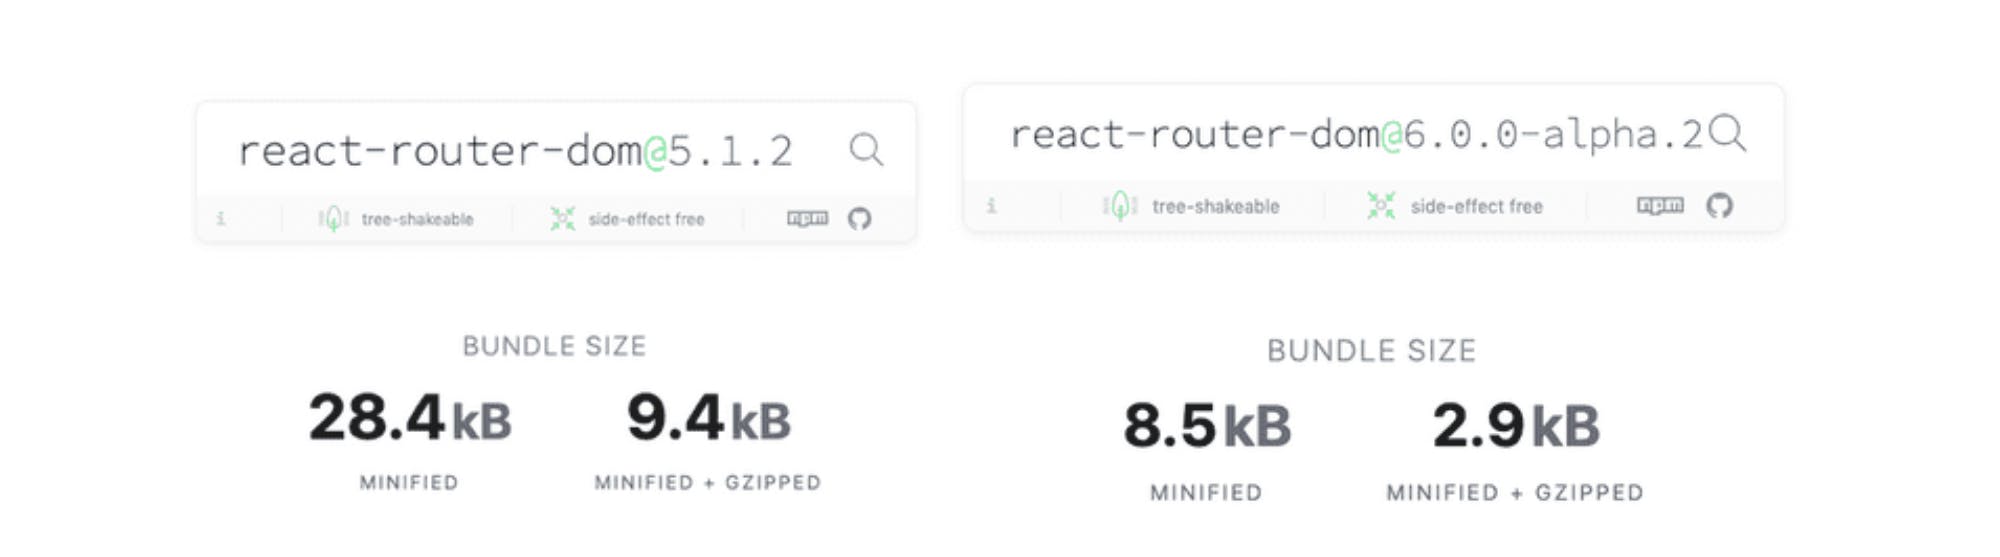
You should also keep in mind that this is just a high-level comparison. React Router contains many modules and hooks that you may not even need in your application, so depending on which pieces you import the numbers will vary.
Introducing <Routes>
One of the most exciting changes in v6 is the powerful new <Routes> element. This is a pretty significant upgrade from v5's <Switch> element with some important new features including relative routing and linking, automatic route ranking, and nested routes and layouts.
Relative <Route path> and<Link to>
Unlike the <Switch> API in v5, all <Route path> and <Link to> values under v6's <Routes> element are automatically relative to the parent route that rendered them. This makes it a lot easier to think about your React Router app as lots of small apps that are just stitched together at different "mount" points.
Example of React-Router v6 App:
import { BrowserRouter, Routes, Route, Link } from 'react-router-dom';

 function App() {

  return (

    <BrowserRouter>

      <Routes>

        <Route path="/" element={<Home />} />

        <Route path="users/*" element={<Users />} />

      </Routes>
    </BrowserRouter>

 );

 }

 function Users() {

 /* All <Route path> and <Link to> values in this
     component will automatically be "mounted" at the
     /users URL prefix since the <Users> element is only
     ever rendered when the URL matches /users/*
  */

  return (

    <div>

       <nav>
        <Link to="me">My Profile</Link>
      </nav>

      <Routes>

        <Route path="/" element={<UsersIndex />} />

        <Route path=":id" element={<UserProfile />} />

        <Route path="me" element={<OwnUserProfile />} />

     </Routes>

    </div>

  );

 }
This example probably looks like no big deal if you're learning about React Router for the first time. It all seems very intuitive! But if you're used to how things work in v5, you'll notice they fixed a few things:
- You don't need to use an
exactprop on<Route path="/">anymore. This is because all<Route>paths match exactly by default. If you want to match more of the URL because you have child routes (see the<Routes>defined in the Users component above), use a trailing*as in<Route path="users/*">.
- All routes and links automatically build upon the
pathof the route that rendered them, so e.g. a<Link to="me">that is rendered inside a<Route path="users/*">is going to link to/users/me.
If you were doing relative routing and linking in React Router v5, you'll notice you don't need to manually interpolate match.path and match.url anymore.
Nested Routes and Layouts
In a large app it's nice to be able to spread out your route definitions across multiple <Routes> elements so you can do code splitting more easily. But in a smaller app, or with nested components that are closely related, you may want to just see all of your routes in one place. This can help a lot with code readability.
Let's continue with the previous code example, except this time we'll combine all of the routes into a single <Routes> declaration by taking the routes that were defined in our Users component and hoisting them up into the App. We'll also use an <Outlet> inUsers where the routes used to be to render the child routes.
import {
  BrowserRouter,
  Routes,
  Route,
  Link,
  Outlet
} from 'react-router-dom';

 function App() {

  return (

    <BrowserRouter>
      <Routes>
        <Route path="/" element={<Home />} />
        <Route path="users" element={<Users />}>
          <Route path="/" element={<UsersIndex />} />
          <Route path=":id" element={<UserProfile />} />
          <Route path="me" element={<OwnUserProfile />} />
        </Route>
      </Routes>
    </BrowserRouter>
 );

}

function Users() {

   return (

    <div>
      <nav>
        <Link to="me">My Profile</Link>
      </nav>

      <Outlet />
    </div>
 );

 }
If you compare this example with the previous one, you'll notice a few things:
<Route children>was used to specify nested routes! The URL paths nest along with the route elements, so/users/merenders<Users><OwnUserProfile /></Users>.
<Outlet>element was used as a placeholder. An<Outlet>in this case is how the Users component renders its child routes. So the<Outlet>will render either a<UserProfile>or<OwnUserProfile>element depending on the current location.
One other small thing you may have noticed is that <Route path="users"> no longer needs the trailing/* on the path. When the routes are all defined together, you don't need it because the router can see all your routes at once.
Note: In React-Router v6 you can now put all your <Routes> in one spot, or spread them out across your app as needed.
Object-based Routes
React Router v6 ships with another API for routing that uses plain JavaScript objects to declare your routes.
The useRoutes hook is a first-class API for routing that lets you declare and compose your routes using JavaScript objects instead of React elements.
Example of How To Use useRoutes
import {
  BrowserRouter,
  Link,
  Outlet,
  useRoutes
} from 'react-router-dom';

 function App() {

  /* We removed the  <BrowserRouter>  element from App because the
   useRoutes  hook needs to be in the context of a  <BrowserRouter>
   element. This is a common pattern with React Router apps that
  are rendered in different environments. To render an  <App>,
   you'll need to wrap it in your own  <BrowserRouter>  element. */

  let element = useRoutes([

   /* A route object has the same properties as a  <Route>
    element. The `children` is just an array of child routes. */

    { path: '/', element: <Home /> },
    {
      path: 'users',
      element: <Users />,
      children: [
        { path: '/', element: <UsersIndex /> },
        { path: ':id', element: <UserProfile /> },
        { path: 'me', element: <OwnUserProfile /> },
      ]
    }
 ]);

  return element;

 }

function Users() {

 return (

    <div>
      <nav>
        <Link to="me">My Profile</Link>
      </nav>

      <Outlet />
    </div>

 );

 }
The useRoutes hook accepts a (possibly nested) array of JavaScript objects that represent the available routes in your app. Each route has a path, element, and (optionally) children, which is just another array of routes.
The object-based route configuration may look familiar if you were using the react-router-config package in v5. In v6, this configuration format has been promoted to a first-class API in core and the react-router-config package will be deprecated.
Suspense-ready Navigation
Version 6 is a great chance for us to get the router all ready for the future of React: suspense. Instead of giving you access to the history instance directly (usage of which would introduce subtle bugs in a suspense-enabled app), v6 gives you a useNavigate hook. This is useful any time you need to navigate imperatively, e.g. after the user submits a form or clicks on a button.
Example:
import React from 'react';

import { useNavigate } from 'react-router-dom';

function App() {

  let navigate = useNavigate();

  let [error, setError] = React.useState(null);

 async function handleSubmit(event) {

    event.preventDefault();

    let result = await submitForm(event.target);

  if (result.error) {

     setError(result.error);

    } else {

      navigate('success');

    }
 }

  return (

    <form onSubmit={handleSubmit}>
      // ...
    </form>

 );

}
If you need to do a replace instead of a push, use navigate('success', { replace: true }). If you need state, use navigate('success', { state }).
In a suspense-enabled app, the navigate function is aware of when your app is suspending. When it is, any push navigation is automatically converted into a replace action. This might be useful when building a single-page app with multiple links, and the user clicks on a link that suspends because it needs to load data, but then quickly clicks on another link and goes to a new page. In this situation the router would automatically omit the first navigation from the browser history because that page never actually loaded.
Of course, the declarative way to navigate around is by putting <Link>s on the page. <Link> uses navigate under the hood to update the URL, so all links will be ready for suspense.
Reading URL Parameters
You can use dynamic :id-style segments in your <Route path> to extract values that you can use to fetch data or render something in your app. The useParams hook returns an object of key/value pairs of URL parameters.
Ambiguous Paths and Ranking
When determining which route to render, the Routes element picks the route with the path that best matches the current location, which is usually the path that is the most specific.
For example, a route with path="invoices/sent" may match only/invoices/sent, so it is more specific thanpath="invoices/:invoiceId" which matches any URL that begins with/invoices(/invoices/123, /invoices/cupcakes, etc). You can organize your code however you'd like and put the routes in whatever order makes the most sense to you.
You can get more source codes and explanantions on how to use the React-router v6 on github by clicking this link: Source Code